Geo-Surface Designer Quick Start Guide
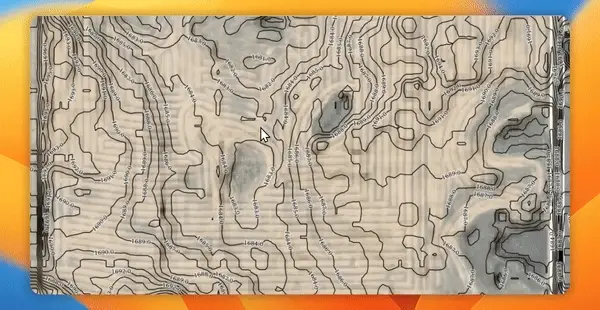
1. Field Elevation Information at your Fingertips. Literally!

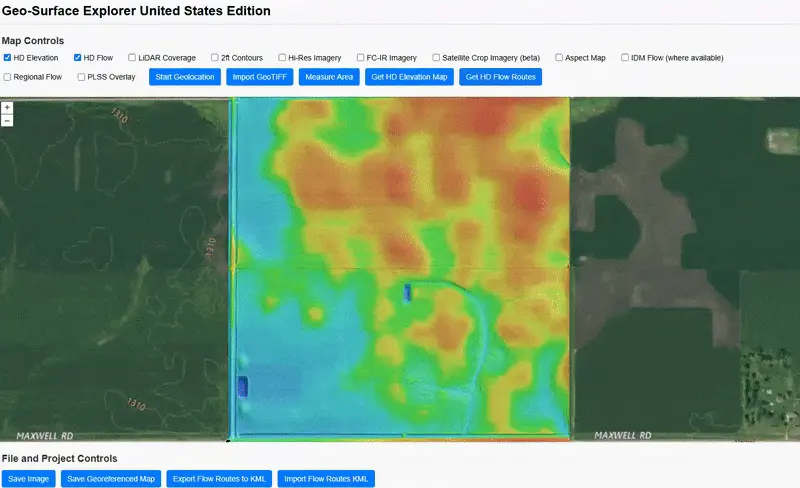
2. Fetch HD Elevation and Terrain Data
- Click the "Get HD Elevation Map" button.
- Draw a polygon around your field. Double-click or click the starting point again to complete the shape.
- Wait a few seconds. A color-coded 3D hillshaded terrain overlay will appear on the map.
Once added, all elevation lookups will use this layer for faster performance since it is temporarily stored in your browser. You'll notice that clicking to view elevations will be instant, and when you draw a route, the profile will populate instantly as you won't be waiting for the data to be fetched from the remote server.
Important Notes:
- Adding the HD Elevation overlay is optional. If you don’t load it, elevation queries will be sent to the server instead. This will still work but may take a few seconds rather than being instant.
- There is a limit to the area you can request (to limit server load). If you get an error when drawing a large region, try again and make it smaller.
- This HD Elevation layer is generated from LiDAR data. In areas without LiDAR coverage (such as parts of Canada), the layer cannot be retrieved.
- Canadian users can check the latest coverage here.
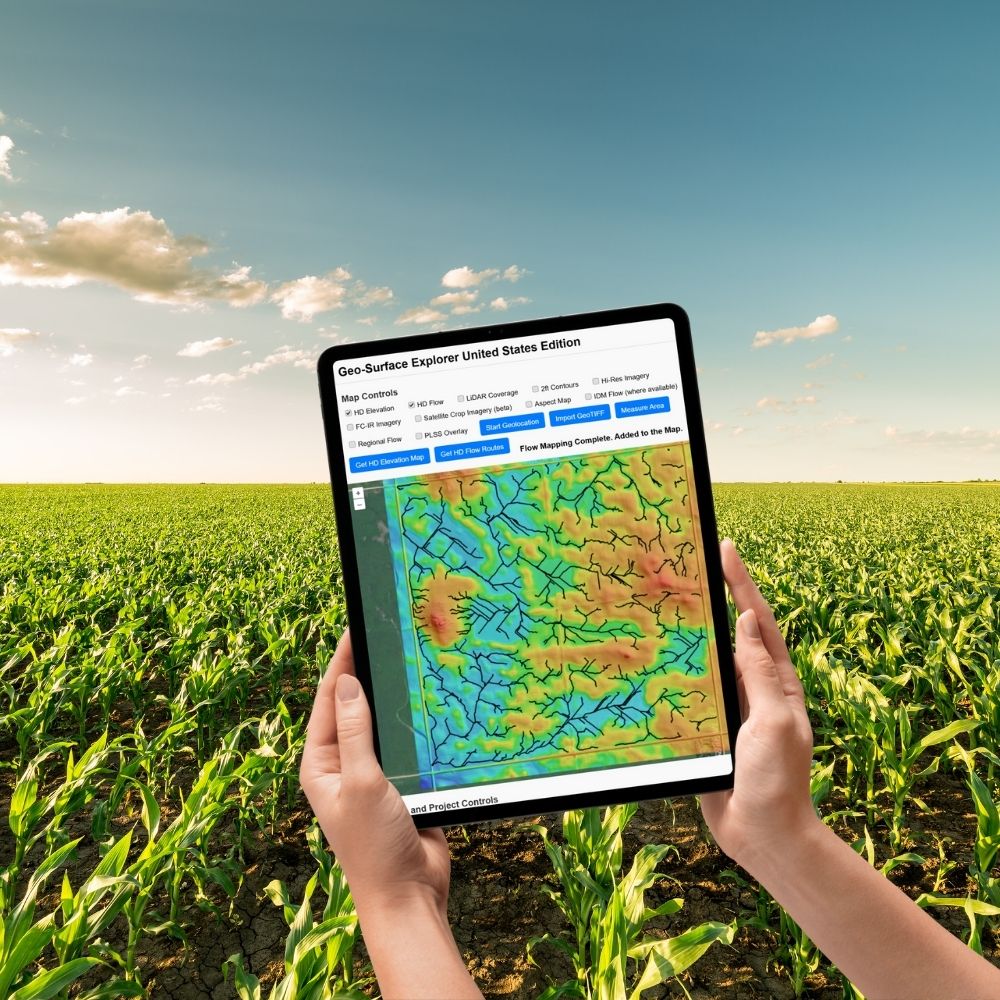
3. Generate HD Flow Mapping for your Field
You can generate high-resolution flow maps with or without the HD Elevation layer.
How to Generate Flow Routes:
- Click the "Get HD Flow Routes" button.
- Draw a polygon around your field. Double-click to complete the shape.
- Wait for processing. You’ll see messages indicating:
- LiDAR data is being fetched.
- Data is uploading to the processing server.
- Once uploaded, the server processes the elevation data and computes flow routes. These will automatically appear on the map when the process is complete.
Saving Flow Routes for Future Use:
To avoid reprocessing in the future and to use the data in Ditch Assist or other programs, it's recommended to save the flow routes:
- Click the "Export Flow Routes to KML" button.
- You can later reload them using the "Import Flow Routes" button.
Important Notes:
- LiDAR Coverage Required: Flow maps can only be generated in areas where LiDAR data is available. If LiDAR is unavailable for your location, no flow routes will be added to the map.
- Maximum Area Limit: Each request is limited to 1,500 acres to prevent overloading the server. If your selected area exceeds this limit, you'll receive a message prompting you to select a smaller area.
-
Smaller AOIs may generate more detailed flow maps due to the way the system processes LiDAR data. When you select a smaller area—such as a quarter section instead of a full section—the server scales the data accordingly to keep processing times within 1–2 minutes. This results in finer detail for smaller AOIs.
If you prefer higher detail, try breaking your field into smaller AOIs and process them individually. If you’d rather have less detail on a smaller field, you can draw a larger AOI that includes more surrounding area (e.g., outline the entire section even if you only need flow maps for a quarter).
- Flow Map Detail May Vary: The flow computation engine aims to generate detailed yet manageable flow maps. However, results may vary based on field topography:
- Some fields may display more or fewer flow lines than expected.
- On very small fields, there may only be a few lines, as only flow above a certain contributing area threshold is modeled.

4. Draw or Drive to Virtually Survey a Proposed Drainage Route
- Manually Draw a Route: Use your mouse or touchscreen to draw a route on the map and instantly view a high-resolution LiDAR-derived elevation profile to start planning your drainage.
- GPS-Based Route Mapping: If you're using a GPS-enabled mobile device, walk or drive along your proposed route in the field—Geo-Surface Designer will automatically pull LiDAR elevation data from your path and display the profile in real-time!
Using Flow Routes & HD Elevation for Optimal Drainage Design
- Flow routes reveal the natural path of least resistance using fill-and-spill modeling—showing where water will flow once depressions fill and overflow downhill.
- The HD Elevation terrain overlay provides a detailed topographic view, helping you identify the best drainage paths.
💡 Pro Tip: Flow routes are your secret weapon for designing smart, efficient drainage! By following natural water movement, you can avoid unnecessary digging and costly surprises, ensuring your drainage system works with the land—not against it.


5. Verify Grade or Model a Best-Fit Drainage Profile
Once you've drawn or virtually surveyed a proposed drain route on the map, you can analyze and refine your design using these tools:
1. Check Grade Along Your Route
- Click any two points on the elevation profile graph to quickly verify the average grade or grade between specific points along your route.
2. Simulate a Best-Fit Drainage Solution
- Click "Draw Best Fit" and select two points—typically the start and end of the run—to generate a best-fit grade solution.
- Adjust the minimum grade as needed:
- 0.05% is a good starting point for surface drainage.
- 0.1% is recommended for tile drainage.
- Click "Apply Offset/Refresh" to recompute the best-fit solution using your updated parameters.
3. Estimate Earthwork & Verify Depth Requirements
- For surface drains, you'll see an estimated earth volume required to be moved.
- Adjust the width parameter (ditch bottom width) for a more accurate estimate.
- This helps you plan efficiently and understand the scale of excavation.
- For tile drainage, check the required starting depth to ensure feasibility.
- Add minimum/maximum depth guides to:
- Quickly visualize how deep your drains will be.
- Ensure tile installations stay within your required depth range.
💡 Pro Tip: These tools give you an advantage by helping you anticipate excavation needs and optimize drain placement—so you’re fully prepared before breaking ground!

6. Simulate a Best-Fit Surface Drain Grade
With a survey profile created, click Draw Best Fit button, and then click on two points on the survey profile (typically he first and last points). The best-fit line will appear, and you can view statistics like estimated cubic yards below the chart. If you make changes to your minimum grade, click Apply Offset button to update the best-fit line and related statistics. Use Reverse Outlet to make the highest clicked point the outlet rather than the inlet.

7. Simulate a Best-Fit Tile Drain Grade
Follow the process above for best-fit surface grades, but add an offset (say 24") to represent your tile's minimum depth. You may also want to change the minimum grade to 0.1%.

8. Estimate Depths with Min Max Depth Guides
Entering values in the min and max depth boxes and then clicking/tapping 'Show Depths' gives you a visual guide so you can relate the proposed design to actual depths. For surface drains this is useful to see how deep your deepest cuts might be, while for tile you'll want to verify that the proposed grade always stays within your minimum and maximum depth parameters.

9. Auto Connect Runs and Verify Your Design
Draw a main drain or tile run, then add another run or lateral that you want to connect to it. As long as the connecting run starts within 30 feet of the main, Geo-Surface Designer will automatically recognize the connection. A black dot will appear on the main drain's profile, indicating where the new run intersects.
Once both the main and the connecting run have a best-fit grade assigned, the dot will turn green if the connection is valid (at or above the elevation of the main run) or red if the connection is too deep (below the grade of the main run).
Continue adding connections as needed to build your system. As you assign grade lines, each connection will validate. Your goal is to create a fully connected system where all dots turn green—no red connections!

10. Backup Often. Resume Easily
Geo-Surface Designer isn’t like traditional software—your data remains private and exists only in your browser. This means that if you close your browser, refresh the page, or navigate away, your current session will be lost. Be sure to back up your work frequently by using the "Export Project" button.
Exporting your project allows you to save and reopen it anytime on any device, ensuring all your drawn profiles and assigned grade lines are preserved. This is especially useful for designing on your office PC and later loading the project on your tablet to guide you while working in the field.